Jonas Club Management
Adding Additional Fields
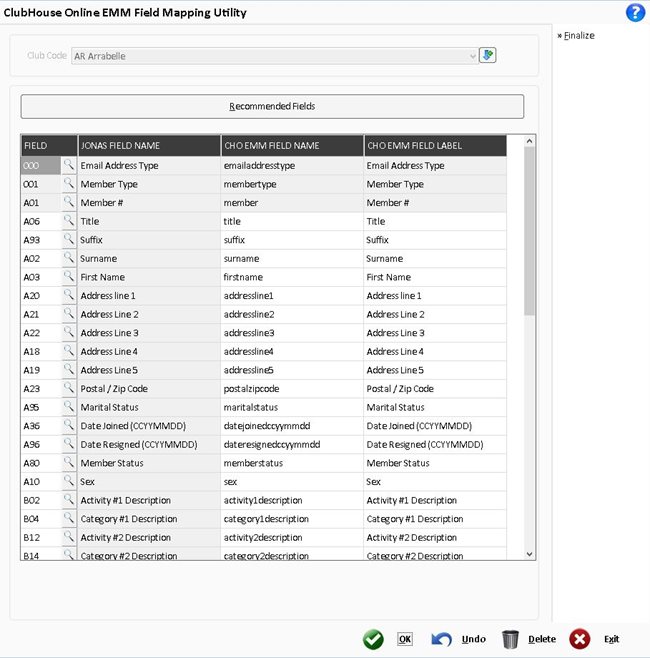
Jonas Club Management allows you to upload more than 100 different fields to the Email Marketing system. There are a total of 28 preselected fields but additional fields can be added. The preselected fields include:
In order to upload additional fields to the Email Marketing system you will need to follow these steps:
- Open your Jonas Club Management application and login with your credentials
- Navigate to Club Management -> Member File -> Member Import/Export -> ClubHouse Online EMM interface Profile
- If it is not pre-selected, select your Club Code.

- Click on the Fields tab
- From the Field Mapping Utility, scroll down until you find an empty row.
- Click on the magnifying glass in the empty row to bring up the available fields

- Type in the name of the field you are looking for to have the field list auto-complete or press CTRL+F2 on your keyboard to bring up a search
- Once you have located your desired field, double click on the Code to have it added to the list of mapped fields.
- Repeat steps 5 - 8 to add additional fields
- Once you are satisfied with the fields added, click on the Finalize button on the top right of the Field Mapping Utility
- You will be prompted to confirm the finalization of the fields you added which you will click on Yes
- An additional prompt will advised how many fields will be finalized which you will click on OK
- You will then be prompted to complete a sync which you will click on Yes
- Once you have completed the sync, you will need to complete an export. Click on the link for Exporting Contacts to Email Marketing.
Removing Contact Fields
In order to Remove Contact Fields from Email Marketing and from the Jonas Club Management export utility, you will need to follow these steps:
- Login to the Email Marketing system.
- Click on the Audience tab.
- Click on the Contact Fields menu
- Locate the field you wish to remove and click on the down arrow on the right directly adjacent to the field name.
- Click on the Archive Field option to remove the field.

- Once you have confirmed the deletion, log into Jonas Club Management.
- Navigate to Club Management -> Member File -> Member Import\Export -> ClubHouse Online EMM Interface Profile
- Select your Club Code if it is not already selected.
- Click on the Sync menu item.
- Once you have completed the sync, you will need to complete an export. Click on the link for Exporting Contacts to Email Marketing.
- Once the export has completed, navigate to the ClubHouse Online EMM Interface Profile
- Click on the Fields menu item

- The field you deleted in the Email Marketing system, should now be different color than all the other fields.
- Click on the field in question so that its code is highlighted and click Delete at the bottom.
- Click OK on the bottom once complete.